
Hive File Restoration – Step By Step
So did you complete Step 1? That wasn’t so bad, now was it? You’ve officially backed up your current HIVE files. Now we need to replace the Hive file your system uses with the originals from when your computers OS was first installed.
Type:
cd ..
cd system32
cd config
delete c:windowssystem32configsam
delete c:windowssystem32configsecurity
delete c:windowssystem32configsoftware
delete c:windowssystem32configsystem
delete c:windowssystem32configdefault
copy c:windowsrepairsam
copy c:windowsrepairsecurity
copy c:windowsrepairsoftware
copy c:windowsrepairsystem
copy c:windowsrepairdefault
Once again not so bad, eh? Now you have deleted the corrupted HIVE files that Windows was booting from and copied the originals into their place.
Type exit and press enter. Your system should now reboot. This time, don’t press a key when it asks you if you want to boot from CD. I prefer to do things in safe mode (it also makes the security tab viewable in most XP Home most of the time) so start pressing F8 right after the ‘Boot from CD’ option goes away. Another menu should show up, select SAFE MODE, and press enter.
With any luck Windows will now boot. If you still get errors on bootup then your system is likely more corrupted than is worth fixing this way, and you may want to consider taking it to a repair joint to have your data backed up and your OS reinstalled.
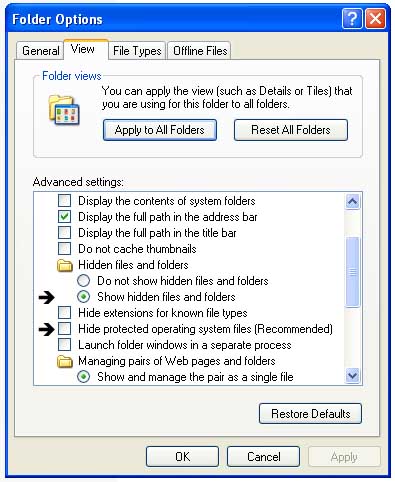
Once Windows is booted then start Windows Explorer: Start->All Programs->Accessories->Windows Explorer. Once in click Tools->Folder Options. This opens a window called ‘Folder Options’ click the view tab. Click the radio button next to ‘Show hidden files and folders’ and un-check ‘Hide protected operating system files’. If you’re in XP Pro, scroll down and uncheck ‘Use simple file sharing’. Click Apply, then OK.

On the C: You should now be able to see a folder called System Volume Information. It’ll look half transparent. This is Windows Explorers way of letting you know that the folder is hidden. Right click on it and go to Properties. Select the Security tab and click Add. Type your username exactly as Windows has it into the objects box and click OK. You’re now going to want to select your name and check the Full Control box under ‘Allow’. Click Apply, then OK.

Now double-click the System Volume Information folder to open it. It shouldn’t give you an access denied error. Once in, you should see either one or a few folders named similar to this _restore{F34409E2-C606-4B88-888C-F7BB6CF35F32}. Double click on one that was created before your problem started. Inside of that there should be several folders named RP1, RP2, etc. If there is only a couple then try another _restore folder. Select an RP folder that is dated a few days before your crash occured. You want to find one that is close to your current date so it’s got all of your settings, but far enough away that it isn’t corrupted. I usually go back about a week or two from when the crash happened. (If you can’t see the dates click view->details) Inside of the RP folder you will see another one called snapshot. Go into it. Highlight the files
_REGISTRY_MACHINE_SAM right click on them, and click copy. Go to the Windows directory, right click and press new->folder. Name the folder hive. Paste the files into the hive directory.
Time to venture back into the land of console. Reboot your system again and go into the recovery console like before. Like last time, once logged in, you should start out in C:Windows. Type:
del c:windowssystem32configsam
del c:windowssystem32configsecurity
del c:windowssystem32configsoftware
del c:windowssystem32configdefault del c:windowssystem32configsystem
cd hive
copy _registry_machine_sam c:windowssystem32configsam
copy _registry_machine_security c:windowssystem32configsecurity
copy _registry_machine_software c:windowssystem32configsoftware
copy _registry_machine_system c:windowssystem32configsystem
copy _registry_user_.default c:windowssystem32configdefault Finished! What you’ve done is deleted the HIVE you backed up earlier and replaced those files with ones that are more current, but pre-crash. Type exit and let your machine reboot. If you don’t like the point that you restored to click Start->All Programs->Accessories->System Tools->System Restore and choose a restore point that better suits you.
_REGISTRY_MACHINE_SECURITY
_REGISTRY_MACHINE_SOFTWARE
_REGISTRY_MACHINE_SYSTEM
_REGISTRY_USER_.DEFAULT


You must be logged in to post a comment Login